How to Make a Picture Book: 8 Steps From Idea to Finished Book
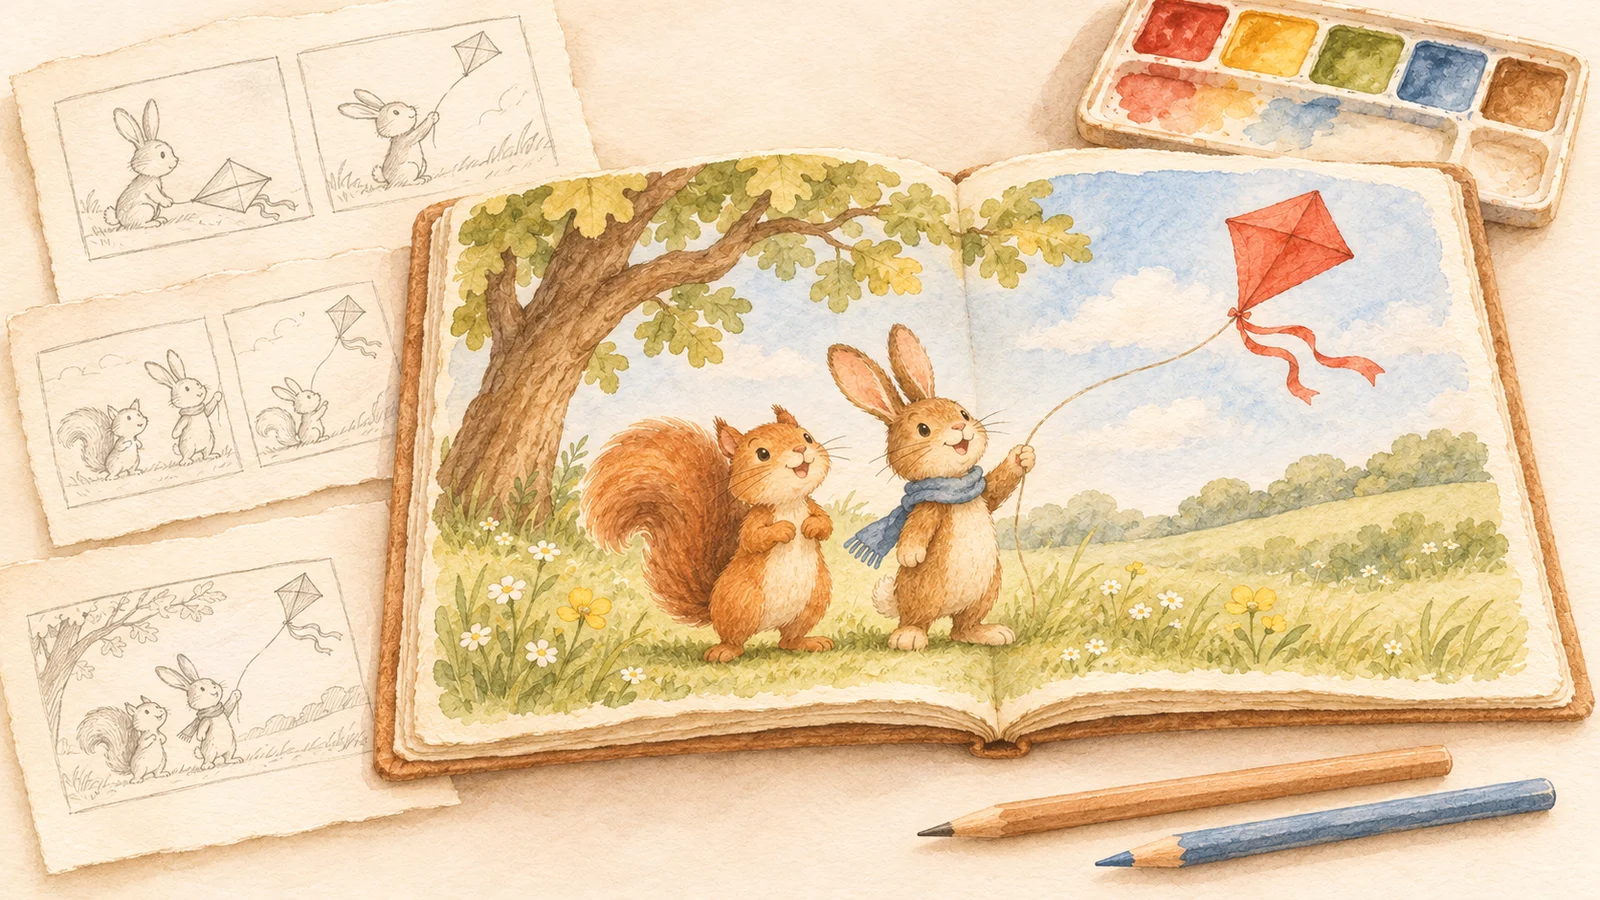
Table of Contents
To learn how to make a picture book, start with a story a child can follow, divide it into pages, and decide what the words and pictures each need to reveal. Sketch a rough book before finishing the artwork, then arrange the pages, read them aloud, and revise before sharing or printing.
You can make a picture book with folded paper, your own drawings, an illustrator, or a digital editor. This guide explains the same creative decisions across those approaches and shows where to put them into practice in Story321. AI is optional: you can start with a blank book and use your own words and illustrations.
Our running example is Milo and the Missing Kite, a short story about a rabbit whose lost kite leads him to an unexpected flying partner. You will see the idea, page plan, illustration brief, and revision choices so you can apply the process to your own story.
1. Choose your reader and the kind of book you want to make
Before deciding how to make a picture book, choose one reader and one purpose. A bedtime story for a preschooler needs different language and pacing from a classroom explanation of how seeds grow.
Write a small creative brief:
- Reader: a child who enjoys being read to.
- Experience: a gentle adventure with a satisfying ending.
- Main character: Milo, a small rabbit who wants to fly his kite.
- Finished format: a digital book to read together, with a PDF to keep.
Then choose your production route. For a handmade book, use folded paper and drawing materials. For a digital book, gather your text and image files. If you want to submit a manuscript to a traditional publisher, check its submission requirements before commissioning finished art: the publisher may pair an author with an illustrator.
In its guide to writing children's picture books, Penguin explains:
“you don’t need to be both”
Here, Penguin's Ladybird and Puffin teams are discussing being an author and illustrator. You can write the story without doing both jobs yourself.
For the Milo example, we will plan a short digital book. Its page plan is a learning example, rather than a specification for a printed publishing format.
2. Give your character a goal and a problem
A topic is not yet a plot. “A rabbit with a kite” describes a subject; “a rabbit loses his kite and must accept help to recover it” gives the story movement.
Use this sentence as a starting point:
[Character] wants [goal], but [problem], so [action], until [change].
For Milo: Milo wants to fly his red kite higher than the oak tree, but the wind carries it away. He searches alone until a squirrel named Rae helps him bring it back.
Plan three beats before drafting:
- Beginning: establish the character and what matters to them.
- Middle: let a problem interrupt the plan, followed by attempts to solve it.
- Ending: resolve the problem through something the character does or learns.
Keep the cast and locations manageable. Milo, Rae, a meadow, and an oak tree give us enough visual material without introducing a new character on every page. The final image can echo the opening: Milo begins alone with his kite and ends flying it with a friend.
3. Write the story for the ear and the eye
One useful way to understand how to make a picture book is to treat the text as the part a reader hears and the illustration as another part of the storytelling. They should work together without repeating every detail.
Compare these two versions:
- Before: “Milo, a small brown rabbit with a blue scarf, stood in a green meadow holding his red kite.”
- After: “Today, Milo would fly higher than the oak.”
The illustration can show his fur, scarf, kite, and surroundings. The shorter sentence gives him a goal and leaves room for the picture. It also creates a question: will he manage it?
Read your draft aloud. Cut sentences that explain what a clear image already shows. Replace abstract lessons with visible actions: Rae offering help says more than a paragraph explaining friendship. Use repetition when it creates anticipation, and choose prose over forced rhyme if rhyme makes the wording awkward.
Keep illustration notes separate from the spoken story. A note such as “The kite is caught above Milo, just outside his view” can preserve an important visual joke. A professional illustrator also needs room to interpret the scene; not every detail needs an instruction.
4. Plan the pages and make a rough dummy
A page is one side of a leaf. A spread is the pair of facing pages you see when a book lies open. A dummy is a rough mock-up used to test the sequence before you invest in finished illustrations.
If you are learning how to make a picture book, a folded-paper dummy helps you notice problems that a continuous manuscript hides. Does a scene need more space? Does a reveal happen before the reader turns the page? Are several pages doing the same job?
Joyce Dunbar, writing for BookTrust in her guide to writing picture books, recommends:
“make a blank dummy book”
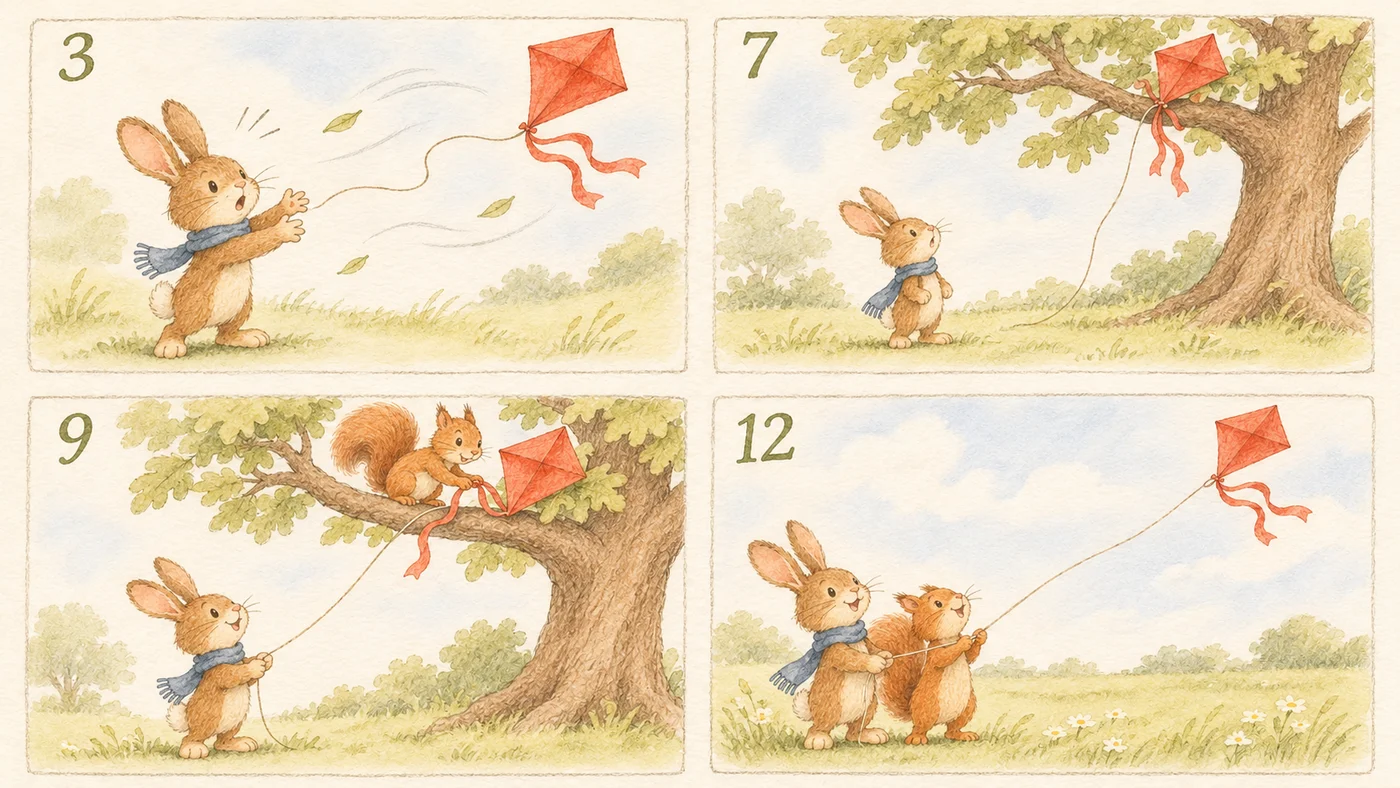
Use rough shapes and stick figures. The purpose is to test pacing, not your drawing skill. For a digital version, start with a page-by-page storyboard. Here is the complete short text and scene plan for Milo; the cover is separate.
| Story page | Words to read aloud | Illustration and turn purpose |
|---|---|---|
| 1 | Milo had a red kite and a very big plan. | Introduce Milo, his blue scarf, and the kite in a meadow. |
| 2 | Today, he would fly it higher than the oak. | Show the tall tree and a rising breeze; set up his ambition. |
| 3 | WHOOSH! The string slipped through his paws. | The string curls away; turn to find out where the kite goes. |
| 4 | Milo looked up. Only clouds. | A wide sky makes the missing kite noticeable. |
| 5 | He searched the daisies. He searched the path. | Show two small search moments with a repeated rhythm. |
| 6 | Then, above him, something red fluttered. | Milo looks toward the branches; save the full reveal. |
| 7 | His kite was tangled in the oak! | Reveal the kite; Milo is much too small to reach it. |
| 8 | “I can help,” said Rae. | Introduce a squirrel looking down from a branch. |
| 9 | Rae loosened the ribbon. Milo held the string. | Give each character an action that helps solve the problem. |
| 10 | Down came the kite, with one leaf on its tail. | Resolve the rescue with a small visual joke. |
| 11 | “Shall we try together?” asked Milo. | Milo offers Rae the string; shift from rescue to friendship. |
| 12 | This time, two friends watched it climb. | Echo the opening meadow, now with both characters. |
When working in Story321, treat each row as one story page. A paper spread sketch can help you think about pacing, but it does not mean you should upload a two-page spread as a single page image.
5. Build a blank picture book in Story321
With your story planned, here is how to make a picture book draft in the editor without asking AI to write it.
- Open the Story321 picture book maker, choose My picture books, and sign in when prompted.
- Choose Create picture book. On the creation screen, choose Start blank, then Create blank book to enter the editor.
- Open Book information and add the title and description. For this example, use Milo and the Missing Kite and a short description of the adventure. Check Reader age and Story language, then choose Save settings.
- Use Add page to build your sequence, then enter the matching Page text from your storyboard.
- Add an Illustration brief describing what belongs in the image. Keep it separate from the words the reader will see.
- Use the Storyboard view to review the sequence. Move up and Move down let you adjust page order before finishing the artwork.
- Save your draft before leaving the editor.
For page 7, the distinction looks like this:
- Page text: “His kite was tangled in the oak!”
- Illustration brief: “Milo, a small brown rabbit wearing a blue scarf, looks up from beneath an oak tree. His red diamond-shaped kite is caught on a branch. Show the distance between his paws and the kite. Leave clear space for the separate page text.”
Changing page text does not automatically rewrite the illustration brief or regenerate the image. If a story detail changes, check all three: the words, the brief, and the selected illustration.
6. Create or collect illustrations that belong together
You do not have to draw professionally to learn how to make a picture book. Choose an illustration route that fits the project:
| Route | What you prepare | What to check |
|---|---|---|
| Draw or paint yourself | Sketches, finished artwork, and clean scans or photos | Consistent characters, even lighting, and usable image quality |
| Work with an illustrator | Manuscript, audience, page plan, and references | Agree on the scope, revisions, and delivery requirements before work starts |
| Use existing artwork | Images you are allowed to use | Matching style, suitable crops, and a clear story sequence |
| Use optional AI assistance | Scene briefs and recurring-character references | Review every result for appearance, action, continuity, and unwanted details |
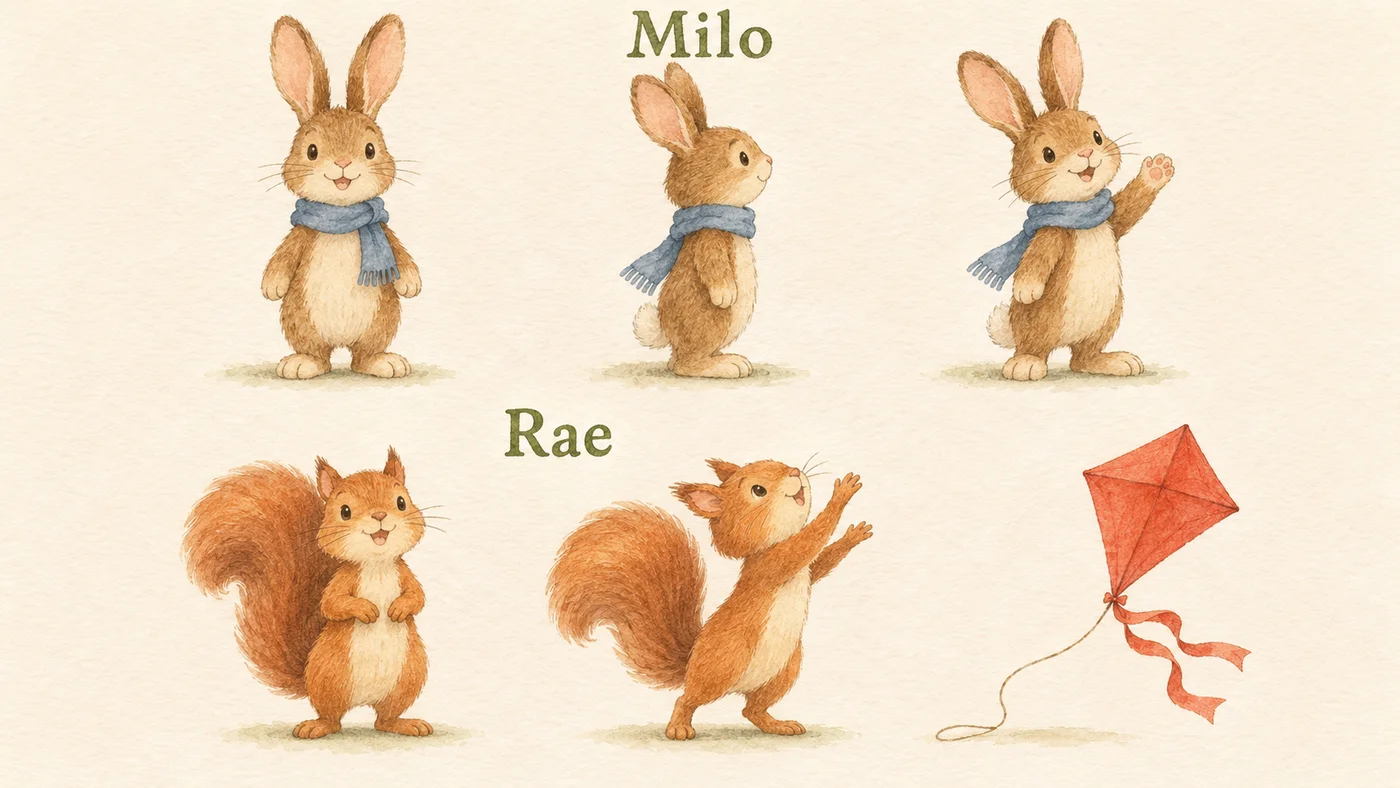
For Milo, write a small character sheet: brown fur, long ears, blue scarf, and the same proportions throughout. Give Rae a separate description. Keep the kite red and diamond-shaped, including in scenes where it appears far away.
In Story321, select a page and use Upload replacement for your own illustration, or My images to choose an existing image. Add a cover illustration as well as the interior images. Review the image on the actual page rather than judging it only as a standalone file.
If you choose AI assistance, use Characters & style to prepare character descriptions and reference images. Confirm the references you want to use and select the relevant references for each page. They guide generation; you still need to check the result. The illustration brief determines what happens in the scene, and you generate and review illustrations individually.
Changing a character description or reference does not repaint existing illustrations. Revisit affected pages whenever a recurring detail changes. For the optional generation workflow and current options, use the AI picture book generator.
7. Arrange the text, images, and cover
Learning how to make a picture book also means deciding where the reader's eye goes first. The illustration should be easy to understand, and the text should remain readable without covering a character's face or an important action.
Story321 offers Image & text separately and Full-page image with text card layouts. Select Page layout to compare them for the current page. Layout changes affect that page's arrangement and image crop; they do not generate a new illustration.
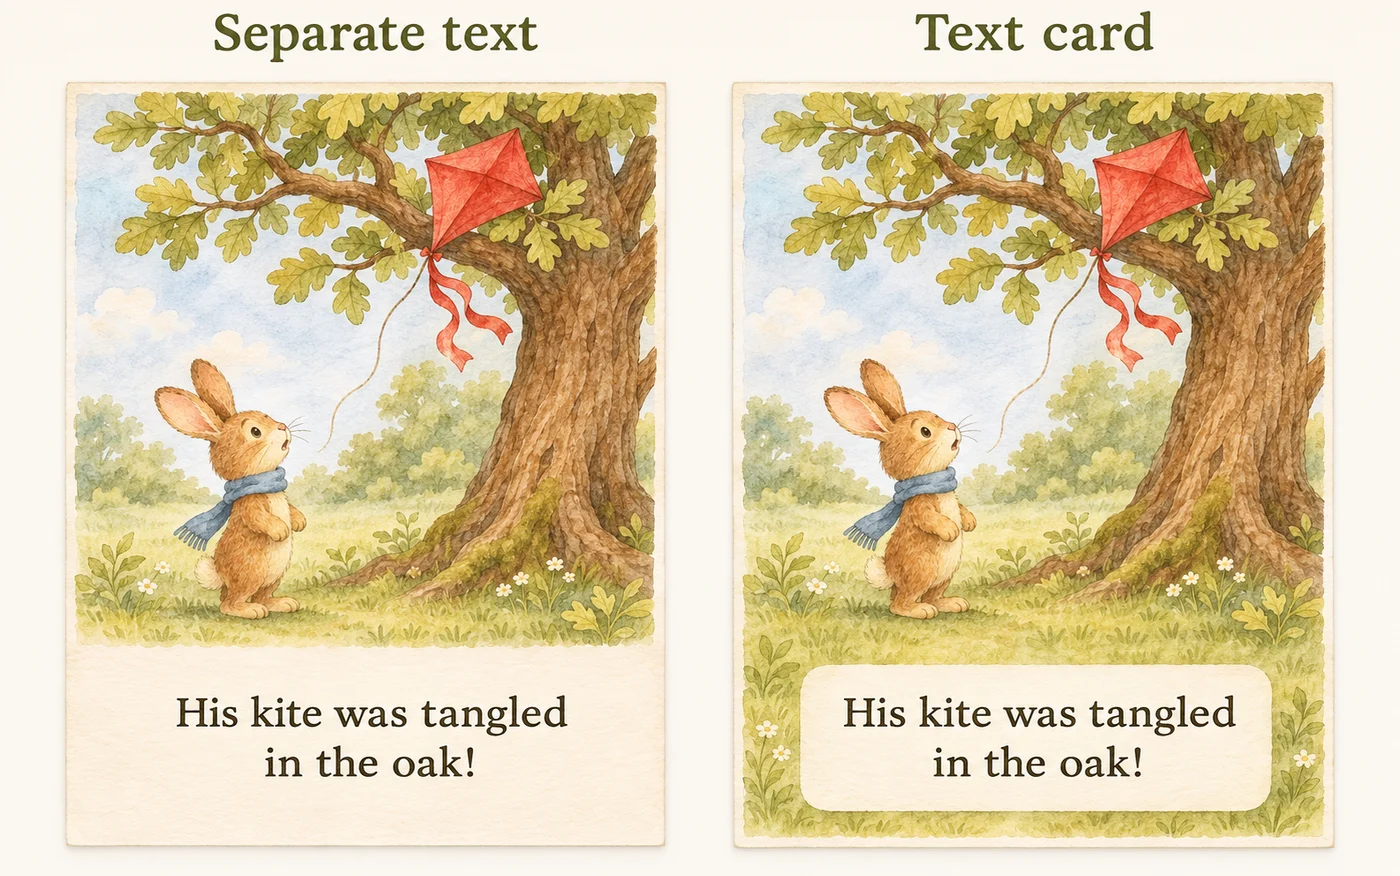
For Milo's page 7, check that the selected crop preserves both the rabbit and the kite. If the reader cannot see what Milo is looking at, the page loses its meaning. Try the other layout or choose a better-framed illustration before adding more explanation to the text.
Use Preview to check the reading sequence. Look for clipped ears, missing kite tails, text overflow, distracting backgrounds, and abrupt changes in character size. Check the book on a small screen as well as a larger one.
For the cover, use a readable title and a clear visual promise: Milo looking toward the red kite suggests the adventure inside. A cover does not need to retell the whole plot. Keep an editable copy of the source artwork so you can make a different crop later.
8. Read aloud, revise, and export your book
The final part of how to make a picture book is checking whether it works as a complete reading experience. Read it from the cover to the last page without stopping to explain missing information.
If you can, read it with someone from your intended audience. Notice where they lose interest, where they predict what comes next, and whether they understand the ending. Revise the page that causes the problem rather than adding explanations everywhere.
For Milo, ask: does the reader know what he wants before the kite escapes? Is the reveal on page 7 worth the turn? Does Milo's invitation to Rae make the ending feel earned? A stronger final image often helps more than a final sentence explaining the lesson.
In Story321, save your edits and choose Download PDF. The delivery check identifies issues such as missing text, missing images, or incomplete book information. Resolve the reported issues and any overflowing text, then export and open the PDF to inspect every page. The export includes the cover and story pages as an image-based PDF.
Use that PDF for reading and sharing. For a home copy, check your printer's scaling and page order before printing the whole book. For commercial printing, confirm the service's trim size, bleed, margins, resolution, page-count requirements, and cover format separately. An exported reading PDF is not automatically a print-ready publishing package.
Amazon KDP's manuscript file specifications state:
“We require single page files”
KDP also specifies image-resolution and other production requirements. That guidance applies to its own printing workflow; follow the specifications of the service you actually choose.
Check your finished picture book
Before sharing, use this final checklist:
- The intended reader and the story's main goal are clear.
- Each page moves the story forward or creates a useful pause.
- Text and images agree without unnecessarily repeating each other.
- Character appearance, props, and locations remain consistent.
- Page turns create questions, surprises, or changes of pace.
- The cover, title, description, page text, and illustrations are complete.
- No text overflows and no important image detail is cropped out.
- The exported file opens correctly and its pages are in order.
- You have permission to use the text and artwork you included.
A common beginner mistake is finishing every illustration before testing the story. Another is treating AI output as finished artwork without checking it. Make the rough version first, then spend your effort on the pages that survive revision.
Questions about how to make a picture book
How many pages should a picture book have?
Penguin describes fiction picture books as usually 32 pages long. That is a common publishing format, not a rule for every handmade or digital project. A printed book also includes production decisions beyond the story scenes, so check the publisher or printer's specifications. When using Story321, follow the current page-count guidance in the editor; its digital format is separate from conventional publishing formats.
How long should the story be?
Penguin's guide gives 500–1,000 words as a usual range for story-based picture books. Reader age, subject, and format matter, and a short family project can use fewer words. The Milo storyboard is deliberately brief. Use enough text to tell the story clearly, then read it aloud and remove what the pictures can already communicate.
How can I make a picture book if I cannot draw?
You can collaborate with an illustrator, use artwork you have permission to use, or choose AI assistance and review the results. Story321 lets you upload illustrations, so learning how to make a picture book does not require generating images. If you are approaching a traditional publisher, follow its manuscript submission process before commissioning a complete illustrated book.
Do I have to use AI in Story321?
No. Choose Start blank, add your own story pages, and upload your illustrations. AI-assisted story drafting and illustration generation are optional actions. The same planning, editing, and review decisions still matter whichever route you choose.
Can I make a picture book at home?
Yes. Fold paper into a rough book, write a short story, and add drawings or collage. For a digital version, assemble your text and images in an editor, export a file, and check it before printing. A home project does not need to start with a commercial publishing format.
Turn your idea into a book you can read together
Now you know how to make a picture book from a simple idea: give a character a goal, plan the page turns, let words and pictures work together, and revise the whole book before sharing it. Use Milo's storyboard as a model for your own sequence, then build a blank draft in Story321 and add your text and artwork.
Start creating with AI
Bring your ideas to life with Story321 tools.
Create Your Picture Book